A door’s ability to swing open is possible because of a mechanism called a hinge, which remains on the door’s edge. As the name implies, a hinge allows for motion in two separate places.
Hinge attachment in older homes typically involves drilling holes in the muntin board and the door frame to secure the hardware. Large horizontal holes get cut out of the frame for each hinge in the modern installation of “mortise” hinges, which get used on the vast majority of wooden doors.
If you are one of those who have been searching for ways to cut door hinges with Dremel, then we are here with the perfect guide on how to cut door hinges with a Dremel.
Guide to cut door hinges with a Dremel
The plunge router adapter turns the Dremel into a surface router, making short work of intricate details across a wide range of relatively basic projects.
In stalling door hinges with a Dremel is a fast and accurate process. If you want to put in your door on your own, you’ll need to know how to use the tools and the procedures involved.
We are going to discuss how you can cut the door hinges with a Dremel. You can follow these steps for a better experience.
Ingredients Needed
Prior to using a Dremel to cut out a door hinge, you need to collect the necessary supplies. While the procedure itself is straightforward, it does necessitate that you pay close attention to detail and have all of the necessary materials on hand.
When using a Dremel to remove a door hinge, you’ll need the following tools and materials:
- A drill (optional)
- Door Hardware
- Tape measure Sharp knife
- Screws
- Dremel
- Eye protection
- Router bit 650
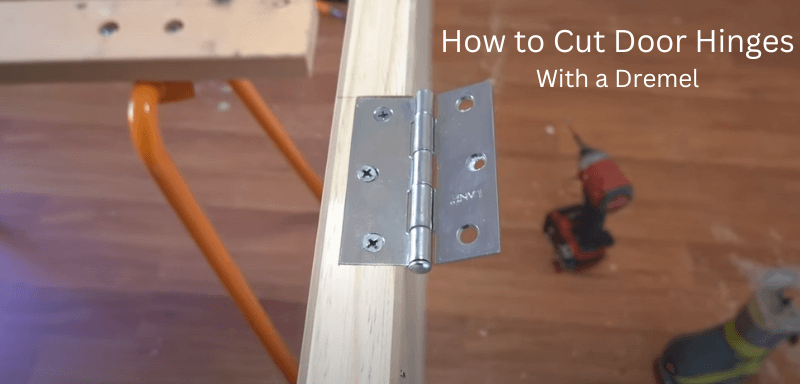
Step 1. Mark the Door
Without properly marking the door, removing the door hinge will be challenging. Put the door where you want it to hang in the entryway and line up the hinges. Find the optimal location for your door, and then make a note there for each hinge.
To achieve this, you can lay the door on its side and use a measuring tape. If you start your tape measure at the top of the door and go down 6 inches, you’ll have a nice, straight line. In the same way that you would measure a pre-hung door, you would begin at the top and work your way down.
Once you’ve located the top hinge, you can draw a line along the measuring tape to have a second reading. Now, tape off the line from the bottom, and trace it with a pencil.
Step 2. Trace the Hinges
After deciding where to put the hinges, you should trace them. Place the door on the ground with its flat side up, grip the first hinge, and align it with the tape. Fold the door in half the way it will be after it gets fit, and line up the hinge with that edge.
You need to ensure that the hinge will function as a good axis when opening and closing. Place the hinge in the center and level it out. Then use a utility knife to gently sketch the outline on both sides. When using a utility knife, go as near to the hinge as possible so you may use the traced outline as a guide when you cut the actual hinge.
To make a clear and legible trace of the top hinge, you need to do this process an additional once or twice. After that, set the bottom hinge in position and trace it with the utility knife just like you did the first. As long as you can make out the mark, you’re good to go after two or even three attempts.
Step 3. Prepare the Dremel
Before you can use your Dremel to cut a door hinge, you’ll need to switch out the bit. Specifically, the 650 router bit is for cutting door hinges, but any straight bit will do the job. Step one is to unscrew the spindle cap and then carefully insert the desired bit head into the spindle.
After you’ve attached the straight-bit router to the Dremel, you’ll need to tighten the spindle. Recheck your measurements to ensure you’ve got the right cutting depth for the door hinge. Now, set the Dremel’s cutting height so that it’s the same as the door’s thickness.
Step 4. Cut the Hinge
You have to wear protective eyewear now because the next step will cause dust and debris to become airborne. Place the router bit in your Dremel tool along the line you just traced with the utility knife. An extra pair of eyes can help with this phase to ensure everything is perfectly straight and level.
At the appropriate time, activate the Dremel and gently press down on the traced dimension. Lightly press down on the Dremel and drag it along each outlined edge until no wood remains. Keep a dustpan handy, as this process will cause sawdust and other debris to fly all over the place you’re working.
After you’ve finished breaking the rules, tidy up and get your door hinge out for a comparison. Put the door hinge on the newly trimmed door and see if it fits. The bottom hinge installation is similar, but once again, double-check that everything fits before proceeding.
Step 5. Attach the Hinge
If the hinges are a precise match for the hole you drilled into the door, you can set them up right away. If they don’t fit, keep cutting with the Dremel until they do, but be careful not to overdo it. To ensure the door remains vertical while you fasten the hinges, ask for assistance from a friend or family member.
The hinges can screw into place using a screwdriver, but an electric drill or screwdriver will get the job done much more quickly. The screws needed to install a door hinge should be in the hinge, but you should always check. To avoid having to keep your hand on the hinge the whole time, it’s best, to begin with the central screw.
FAQ’s
Can a Dremel replace a router?
This adapter transforms your Dremel Multi-Tool into a plunge router, perfect for use in woodworking and other DIY projects requiring routing. As a result, you won’t have to buy a separate plunge router. You can do inlay work, carve letters and signs, and rout circles with just this one attachment.
How does a router differ from a Dremel?
Speed. Routers are superior to Dremel tools in terms of both power and speed. The RPM range of routers varies, although it’s not unusual to see values between 15,000 and 35,000. In contrast, the 7300 series of Dremel’s heavy-duty tools can produce RPMs of between 6,500 and 13,000.
Final Words
The usefulness of a Dremel framework for removing a door hinge is thus readily apparent. It not only helps you get things done more quickly, but also to a higher standard of precision. You should find it less of a challenge now that you know how to cut door hinges with a Dremel.
You should now be able to cut door hinges with a Dremel with confidence. Surely you’re not suggesting that this is an incredibly challenging task.
Related Articles